Factory directly sale Special Wax in Agriculture and Forestry to Sheffield Manufacturer
Short Description:
Product Detail
Product Tags
Factory directly sale Special Wax in Agriculture and Forestry to Sheffield Manufacturer Detail:
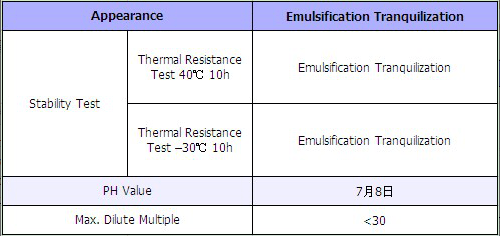
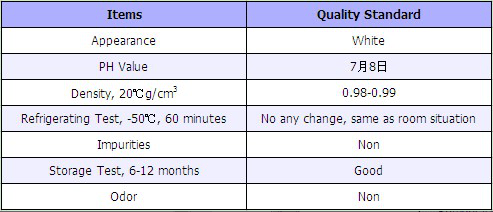
(1)YNE4 Series Special Molding Moisturized Wax for Fruit Trees
In order to protect fruit trees and shrubs from desiccation during winter dormancy or transportation or to keep moisture in summer drought, Special Molding Moisturized Wax is spayed on the surface of trees, forming the protecting film in surface of trees. The film has some adequate micro pore that could efficiently reduce the losses of moisture in the surface of the trees, and it simultaneously ensures physiological respiration of the trees.
(2) YNE5 Series Special Preventing Frostbite Wax for Trees
(3) In large northern areas of our country, the winter season is severe cold and the spring season is more heavy windy.
The early winter and the late spring’s frost are quite disadvantage to young plant, the weather is particularly abnormal coldness after spring comes, and frequently injures these trees. As a result young plant is cold death. YNE5 Series Special Preventing Frostbite Wax for Trees not only has anti-freezing effect on trees but also well effect on anti-sprouting etc. Spraying on branches and leaves of trees can make exuberant growth of foliage.
Product detail pictures:
Bear "Customer initially, High quality first" in mind, we do the job closely with our customers and supply them with efficient and skilled providers for Factory directly sale Special Wax in Agriculture and Forestry to Sheffield Manufacturer, The product will supply to all over the world, such as: Israel , Austria , South Africa , Make sure you genuinely feel free to send us your requirements and we are going to respond for you asap. We now have got a skilled engineering group to serve for your just about every detailed needs. Cost-free samples could be sent to suit your needs personally to understand much more information. In an effort to meet your requires, be sure to seriously feel free to make contact with us. You may send us emails and contact us directly. Moreover, we welcome visits to our factory from around the globe for much better recognizing of our organization. nd objects. In our trade with merchants of numerous countries, we usually adhere for the principle of equality and mutual benefit. It is really our hope to market, by joint efforts, each trade and friendship to our mutual advantage. We look forward to getting your inquiries.
***VISIT OUR SPONSORS***
https://www.traderadiators.com | https://www.grahamplumbersmerchant.co.uk | https://www.buteline.com/uk | https://www.adey.com
***WEBSITE***
https://www.plumberparts.co.uk
***Facebook***
https://www.facebook.com/profile.php?id=100001119410854
***Twitter***
https://twitter.com/#!/plumberparts
This video covers how to chase pipes into a wall or floor screed. Enjoy!
Today we are looking into screeding, I also have to sink pipes into a wall. Now, this was suggested to us by a lovely man on Twitter, I think he was called “disco dimmer” or something like that. His question’s appearing in the screen below me right now. So, anyway, as you can see, we’ve got lovely chase here, it’s been chased down lovingly by Gavin. And if you look closely, we can see, the more you start, this is basically coming out with a grinder. And I’m sure all along, he wore gloves, and he wore goggles and mask. And basically, he’s ground it out, ground it out of there. And then used an SDS router or a chisel, to just gut all this all out, and then sweep all that away. We look at the floor, we can see that he’s made a lovely little screen out just here. We get down, and have a quick look, we’re gonna see that it’s quite deep screen. So we’ve got good sort of, 40 or 50 mil there. And also, if you look here as well, we’ve got a pipe in here. You see, that’s nice and deep there as well. We’ve got a hell of a lot of room. So the thing you’ve got to think about, that’s really important when it comes to sinking pipes into the wall, is obviously the depth of the wall itself, how you’re gonna fix the pipe, so when someone comes over to render this wall, or plaster it or anything like that, that the pipes aren’t gonna move. And also, really, really, importantly, there how you’re going to try to insulate your copper pipe. Now, there’s kind of two ways you can attack it. You can either insulate it to stop the heat getting out, which is obviously a brilliant way, and also kills two birds with one stone. This is very important that the concrete, or any kind of render, doesn’t touch the copper itself, ’cause it can rot through it. So, hopefully, depending on the depth of the screed, we should be allowed to fit in this nice 15 mil by 30 mil wall. And it’s still got enough depth to then be able to render over that. Sometimes you’re trying to sink pipe into a single brace stop wall, which is only as much as four inches deep sometimes. When that happens, you’re gonna want to dig out a pipe there, and then basically gaffer tape up the pipe. We find that that helps to stop anything kind of climbing onto the pipe when it’s drying out.
Basically, what we’re gonna do is, I’ve got some double clips. We’re gonna pop a few double clips in down here, get our pipes laid out in the bottom, and basically get our pipes up in the thing, ready for Gavin to come over here in a few days’ time, to render up, and then we’ll be fitting the radiator back on in a couple of weeks. So yeah, let’s do that now, and I hope you enjoy it. We’ll have just a quick look here, at the depth that we’ve got. See if we can give him enough clearance. I mean, that is lovely. So we can get a nice pipe round there, we’re gonna screen over the top of that, absolute treat. This is going up through the wall, and then out at the top, it’s gonna elbow sort of back over up in the loft space. Just gonna put the elbow there now. Pop that through on up. Ah, look at that. Huge amount of space, there, now. Well, it’s now just a matter of getting our lovely insulation on. So we’re gonna get a bit on like that, now where the clips are, we’re not gonna put any on, okay? Because the width of the insulation, when there’s two next to each other, is quite tight.
Okay? So now we’re gonna do that.
So, then, like I was saying, there are other ways. Okay, if you’ve got an issue with depth, okay, you haven’t got the room. Now, let’s say, the old days what they used to do, is they’d actually get newspaper and wrap it around it. Anything to stop the concrete actually touching the pipe while it’s wet, okay? And also touching it later on as well, ’cause it does go through pipe. I’ve always found a really good way to do that, is basically, gaffer tape. Gaffer tape is, you pop it down here like so, wrap it around. Then you know now, that nothing’s gonna actually get on your pipe. And the same goes for the floor. Now, if I were to wrap as well, a couple of wraps around, and make sure there’s a couple little ridges as well. So, it’s really sort of free to move as it wants. And once that’s there, and all that, there’s no way that’s ever gonna cling on there, or anything like that. There’s a nice little bit of room in there, as well, it sort of protects the pipe a little bit, so that’s, I said, the other way. So, a closer look at that.
For more videos visit my website at
https://goo.gl/tfllo