
Well-designed Precision Casting Wax Export to Peru

Short Description:
Product Detail
Product Tags
Well-designed Precision Casting Wax Export to Peru Detail:
Precision Casting Wax mainly is used for precision mechanical process with zero allowance or very limited allowance. We can not adopt general casting technique, but can only adopt zero allowance casting or precision casting. Because of the product’s structure is very delicate and complex especially in bejeweled with golden and silver, such as diamond ring, brooch, earring etc.
The characteristics of precision casting wax are: good coating property, no denaturalization to be heated, good flow ability, good thermal stability, and well surface finish.
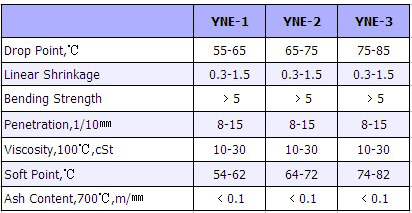
Product detail pictures:
Our firm aims to operating faithfully, serving to all of our consumers , and working in new technology and new machine continually for Well-designed Precision Casting Wax Export to Peru, The product will supply to all over the world, such as: Manila , Iceland , Botswana , We warmly welcome you to come to visit us personally. We hope to establish a long-term friendship based on equality and mutual benefit. If you want to get in touch with us, please do not hesitate to call. We will be your best choice.
Prototype of a new linear electromechanical actuator based on a novel approach.
www.kataka.dk
Our web site: https://HowMachineWorks.com
Hi Guys, in this video we have put some effort to create an animation to help you learn how a wax tyre thermostat works. In this 4 minutes animation video, we explain clearly with the precipice movement of the thermostat poppet opening and how the cooling process happens, each of the components are also marks for easy identification.
Plz Join Our Face Book Page: https://www.facebook.com/HowMachineWorks
Our Android app Google play: https://play.google.com/store/search?q=techtrixinfo&c=apps
We need your support to keep going: Please click like button, comment, share in social media, join our face book page https://www.facebook.com/HowMachineWorks or please bookmark our site https://howmachineworks.com
You can subscribe to us for more technical videos; thanks for your support have a great day.
Related topics:
honeywell thermostat
thermostat
diesel cars
wifi thermostat
pid controller
wireless thermostat
programmable thermostat
temperature sensor
thermostats
white rodgers thermostat
digital thermostat
smart thermostat
honeywell thermostats
radio thermostat
totaline thermostat
carrier thermostat
thermostat wifi
honeywell programmable thermostat
honeywell wireless thermostat
lux thermostat
best thermostat
thermostatic radiator valves
remote thermostat
tata motors india
room thermostat
car thermostat
thermostat housing
steam machine
robertshaw thermostat
line voltage thermostat
water heater thermostat
danfoss thermostat
radiator thermostat
wireless room thermostat
internet thermostat
temperature switch
robert shaw thermostat
heat sensor
thermal switch
humidity control
termostat
plug in thermostat
home thermostat
temperature control
honeywell controls
ac thermostat
heating controls
honeywell digital thermostat
pid temperature controller
thermostat reviews
home depot thermostat
central heating thermostat
oven thermostat
remote control thermostat
carrier infinity thermostat
central heating controls
electronic thermostat
ranco thermostat
thermostat honeywell
wifi thermostats
thermostate
programmable thermostat reviews
millivolt thermostat
wireless thermostats
thermostat switch
programmable thermostats
humidity controller
refrigerator thermostat
heating thermostat
johnson controls thermostat
thermostat settings
new diesel cars
boiler thermostat
new thermostat
noma thermostat
thermostat replacement
ksd301
wireless thermostat reviews
digital room thermostat
fridge thermostat
ranco controls
network thermostat
ip thermostat
honeywell temperature controller
thermostat with remote sensor
siemens thermostat
touch screen thermostat
maple chase thermostat
hot water heater thermostat
heater thermostat
central heating thermostat
digital thermostat
heating thermostat
room thermostat
plug in thermostat
boiler thermostat
honeywell controls
heating controls
thermostats
wireless thermostat
thermostat repair failure animation parts components
what is a thermostat
how it works how it work


